

In part 1 of this series we managed to set up and run a project with a sample frontend of our app presenting drink recipes. We familiarised ourselves with the general structure we navigate in, and we learned what Vue and Nuxt.js framework are.
In part 2 we expanded our knowledge with ways in which the frontend app communicates with the remaining services via API, and we learned about creating views/templates, as well as the advantages of using readymade GUI libraries. It all came down to using readymade components and writing code that handles interactions with these components.
In this third and final part we will make sure that communication with our API is safe, and our data can be displayed in several supported languages.
Let’s begin!
Authentication and authorisation
Let’s start with a brief explanation of these two terms.
- Authentication – verifies user identity (typically with the use of login and password),
- Authorisation – verifies if the user has access to particular resources or is allowed to perform certain actions.
It’s simple, and yet we tend to confuse the two and use them interchangeably, even though they refer to two completely different events.
As you can probably imagine, we are not going to re-invent the wheel. We will use an existing and constantly developed module called Auth. To do that, we need to install and configure it to work with our frontend:
$ npm i --save @nuxtjs/auth
Before configuring the module, we need one more dependency, i.e. a global state module that can be used with multiple components (singleton lives on!). Vue includes a built-in Vuex library for managing such state. Its description is not in scope of this text, but it is required by the Auth component to store session state and user data. To include it in our project, we simply need to create a single file:
// src/store/index.js
export const state = () => ({});
export const mutations = {};
Now, we can proceed to configuring the Auth module:
// nuxt.config.js
modules: [
'@nuxtjs/auth',
// ...
],
auth: {
watchLoggedIn: true,
redirect: {
login: "/account/login",
logout: "/",
callback: "/account/login",
home: "/"
},
strategies: {
fdb: {
_scheme: "local",
endpoints: {
login: {url: "/auth/login", method: "post", propertyName: "token"},
logout: {url: "/auth/logout", method: "post"},
user: {url: "/auth/user", method: "get", propertyName: "user"}
}
}
},
token: {
prefix: "token."
},
localStorage: {
prefix: "auth."
},
cookie: {
prefix: "auth.",
options: {
path: "/",
}
}
},
// ...
The above configuration enables our product to control user session. Using the auth.redirect attribute (documentation), we define URLs to which user should be redirected to log in, after logging out, or after successful log in.
Mechanisms responsible for storing authorisation token on the client’s side have been configured as well. By default, the token is stored in several locations, such as cookies, local storage or vuex.
The key in this configuration is the selection of an authentication strategy. Using a library, we can provide popular sign-in options using Facebook, Google, Github or Auth0, or even Laravel Passport. Apart from readymade integrations, we can also add our own using the oauth2 or local standard. In our case, this would be a basic authentication mechanism based on the JWT token generated and verified by our API. Such configuration has been included in the example above. The strategy name (fdb) can be replaced by anything you like.
As you can see above, multiple authentication strategies can be supported.
Next step is to prepare routing supporting the addresses specified in the section
auth.redirect
Let’s do that!
Login form and action
Let’s start with a login form
// src/pages/account/login.vue
<template>
<v-content>
<v-layout align-center justify-center row>
<v-flex xs10 md5 lg3 class="py-3">
<v-form ref="form" v-model="valid" lazy-validation>
<v-alert :value="isError" type="error" class="mb-3">
Wystąpił błąd podczas logowania lub podane błędny login i/lub hasło.
</v-alert>
<v-text-field
v-model="form.email"
:rules="rule.email"
:disabled="isSubmit"
solo
label="Login"
type="email"
required
@keyup.enter="submit"
></v-text-field>
<v-text-field
v-model="form.password"
:rules="rule.password"
:disabled="isSubmit"
type="'password'"
solo
label="Hasło"
required
@keyup.enter="submit"
></v-text-field>
<div class="text-xs-center">
<v-btn
depressed
color="primary"
:loading="isSubmit"
@click="submit"
>
Zaloguj się
</v-btn>
</div>
</v-form>
</v-flex>
</v-layout>
</v-content>
</template>
<script>
export default {
data() {
return {
valid: true,
isSubmit: false,
isError: false,
form: {
email: "",
password: "",
},
rule: {
email: [
(v) => !!v || "To pole jest wymagane",
(v) => /.+@.+/.test(v) || "Adres e-mail musi być poprawny",
],
password: [(v) => !!v || "To pole jest wymagane"],
},
passwordShow: false,
};
},
methods: {
submit() {
if (this.$refs.form.validate()) {
this.isSubmit = true;
this.$auth
.loginWith("fdb", {
data: { username: this.form.email, password: this.form.password },
})
.then(() => this.$router.push(`/`))
.catch(() => {
this.isSubmit = false;
this.isError = true;
});
}
return false;
},
},
};
</script>
Do not worry if there are parts that you don’t understand. The above code is responsible for rendering a login form asking for an e-mail address and a password. Additionally, it has been enriched by basic mechanisms to validate input data.
Values of the data input fields are connected with the model of our component. In short, the line v-model=“form.email” means that the attribute this.form.email in the JS code of our component will always include the current value from the form. Initial values of these attributes are defined in the data( ) method.
It is also important that the action of clicking “Log in” button runs the code from the submit( ) method due to the @click=“submit” assignment. This is a custom method, therefore unlike e.g. data( ), it is located in themethods: { field. Going back to the login process, once clicked, the button is replaced by a spinning ‘loading’ icon, which also means that it cannot be clicked again (from my experience, we developers expose ourselves to DDoS attacks because we tend to forget about such basics).
The next part is the most important one in terms of the authentication process:
this.$auth
.loginWith("fdb", {
data: { username: this.form.email, password: this.form.password },
})
.then(() => this.$router.push(`/`))
.catch(() => {
this.isSubmit = false;
this.isError = true;
});
The above code refers to an object instance – the authorisation module, by invoking on it a method that points to a previously defined fdb login strategy and submitting data that we want to send to the endpoint, which was earlier configured under the key
auth.strategies.fdb.endpoints.login
How the authentication process is executed
- The user enters the e-mail address and password in the login form available at /account/login.
- Once the user clicks the “Log in” button, the fdb login strategy is executed with form data like login (username) and password (password).
- The login request is submitted to the /api/auth/login endpoint.
- Nuxt.js captures the request on the server’s side and, in accordance with our axios and proxy configuration described in the previous part of this series, redirects the request to the backend at http://api.example.com/auth/login (remember that the configuration of axios proxy removes /api from the address).
- Authentication process is run on the server’s side, and it can return an error (using the response code) or a JSON structure (in case of success) with required token field (the name is defined in the configuration, under the keyauth.strategies.fdb.endpoints.login.propertyNamewhich will be used by the Auth module in any communication in the future.
The token is stored in multiple locations, as per the configuration. In our case, the locations are local storage, cookies and vuex.
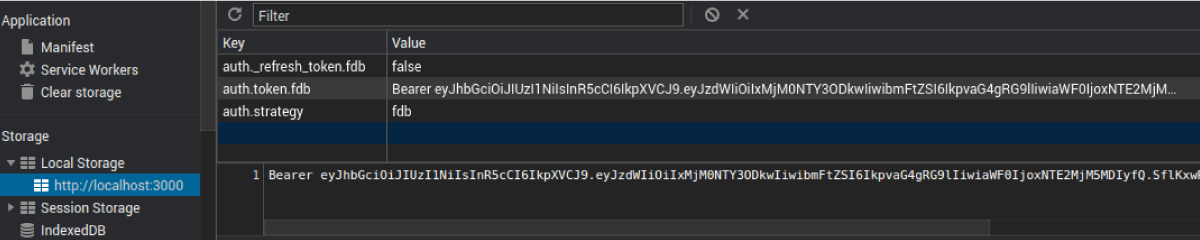
Local storage with info on the authentication strategy and the token.
- In case of success, the endpoint used to fetch user data, defined under thekeyauth.strategies.fdb.endpoints.useris automatically queried. The token obtained during the authentication process is attached to the request. JSON response must also include a field with the name we defined earlier:auth.strategies.fdb.endpoints.user.propertyName.
- User data is saved by Vuex, and the logged-in user is redirected to the home page.
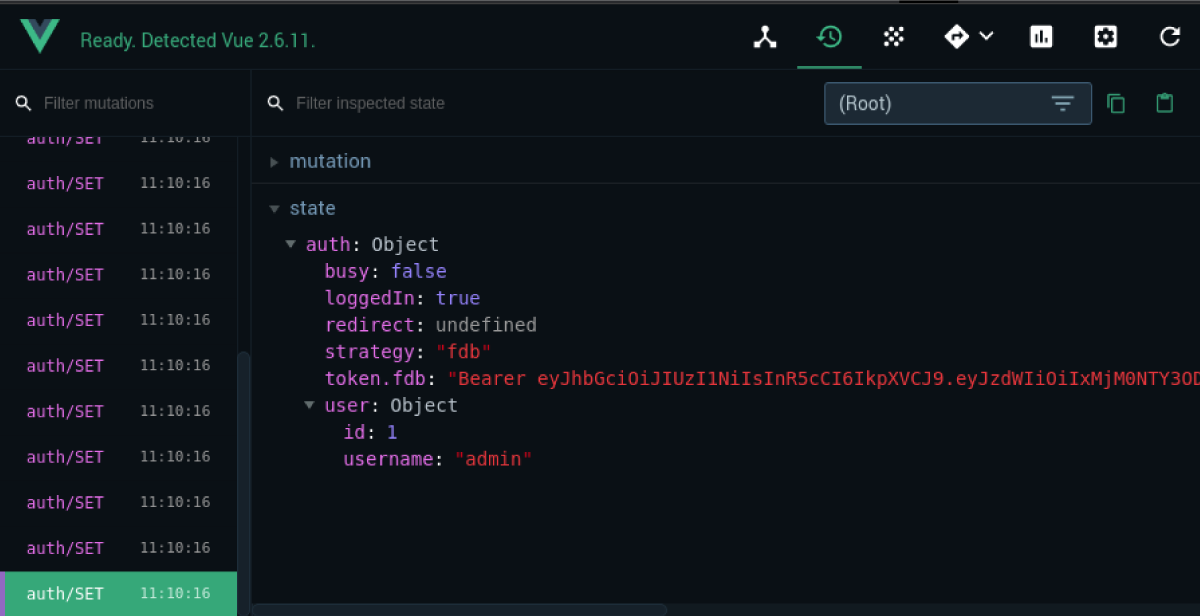
User data in Vuex.
After logging in, we can check user session state and user data using an object – the Auth module:
this.$auth.loggedIn // true of false
this.$auth.user // {user} or false
Logging out
The routing responsible for logout (ending user session) is definitely simpler and limited to executing a single logout method. Notice that we use a middleware called auth that ensures this page can only be accessed by authenticated users.
// src/pages/account/logout.vue
<template>
<div></div>
</template>
<script>
export default {
middleware: "auth",
mounted() {
this.$auth.logout();
},
};
</script>
Access control
Frontend
After configuring the mechanisms of logging in and creating sessions, we can proceed to securing our website. To make sure users without session (guests) cannot access particular addresses, we can use a dedicated middleware called auth.
// src/pages/my-page.vue
<template>
<!-- template code ... -->
</template>
<script>
export default {
middleware: "auth",
// …
}
</script>
When a user with no valid session visits the website, they will be automatically redirected to the login page.
Apart from controlling sessions, we can also check for appropriate access levels. For that, the user object returned by the backend should include a field with authorisation flags. This may be an array or an object with flags that can be verified in our frontend app code with the use of the hasScope method:
this.$auth.hasScope('admin')
Backend
We know how to control access on the frontend side. Now it’s time to secure our requests submitted to the backend.
In the previous part we prepared a repository for fetching information about our recipes. Now we will secure our requests by adding an active session token submitted in the header in the following form:
Authorization: Bearer TOKEN.
To do that, we edit the repository to add the required methods:
// src/repositories/RecipesRepository.ts
class RecipesRepository implements RecipesRepositoryInterface {
private authToken: string | undefined;
public withToken(authToken: string) {
this.authToken = authToken;
return this;
}
public addAuthHeader() {
return this.authToken ? { authorization: this.authToken } : {};
}
// ...
}
Next, we add an appropriate authorisation header to requests submitted in this repository:
// src/repositories/RecipesRepository.ts
// ...
public getCollection(page: number = 1, perPage: number = 12): Promise<RecipeModel[]> {
return this.client
.get<{ items: RecipeModel[] }>('/api/recipes', {headers: this.addAuthHeader()})
// ...
}
public getById(id: string): Promise<RecipeModel | null> {
return this.client
.get<RecipeModel>('/api/recipes/' + id, {headers: this.addAuthHeader()})
// ...
}
public countCollection(): Promise<number> {
return this.client
.get<{ total_pages: number }>('/api/recipes', {headers: this.addAuthHeader()})
// ...
}
// ...
Next, we use these new methods when implementing the repository:
// src/pages/recipes/_id.vue:
// ...
async asyncData({ params, $auth }) {
return {
recipe: await repositoryRecipe.withToken($auth.getToken('fdb')).getById(params.id),
};
},
// ...
This way we submit current JWT token with each request submitted to the backend.
Frontend-backend session synchronisation
In the majority of systems, when users without access to a certain resource (due to lack of authentication or authorisation) submit a request, as a response they receive the 403 Forbidden or 401 Unauthorized status. In such a case, frontend with an invalid or outdated session (token) on the backend side can perform a logout.
A peculiar type of resource I have seen in my work is one that returns data every time, but for users with active sessions more data is provided (e.g. with more details), whereas guests receive only publicly available information. Such resources always return the 200 OK code. How can we tell when an active frontend session is invalid on the backend’s side? When it comes to users, they remain logged-in and have full access, but the scope of returned data is limited.
One of the solutions I used was to make sure that backend session state is returned with every API response, regardless of the resource. This may be a custom header (e.g. x-backend-session) with the value of 1 in case of active backend sessions or 0 for nonexistent or invalid sessions. Each response from our API should be monitored for this header to allow the frontend app to respond appropriately.
To implement this mechanism in our case, we need to add a correct plugin to the axios module:
// src/plugins/axios.js
export default function ({$axios, store, app}) {
$axios.onResponse(response => {
const isInternalRequest = response.config && response.config.baseURL === "/api";
const isBackendSession = response.headers && response.headers["x-backend-session"] === "1";
const isFrontendSession = app.$auth.loggedIn;
if (isInternalRequest && isFrontendSession && !isBackendSession) {
app.$auth.logout();
}
});
}
Obviously, it should be registered in Nuxt.js
// nuxt.config.js
plugins: [
"~/plugins/axios",
],
A frontend app configured this way is ready to handle user sessions with different access levels, while synchronising session states between the frontend and the backend API.
Finally, we need to ensure support for translations and multiple languages.
안녕하세요 월드 – supporting multiple languages
To provide the contents in multiple languages, we will use a readymade Nuxt.js library called nuxt-i18n, which is an overlay for Vue I18n. This means we can include any translation in our code, and we don’t have to worry about the routing or detecting user language.
To install it, we simply need to add the package:
$ npm i --save nuxt-i18n
and configure it in the project:
// nuxt.config.js
modules: [
[
'nuxt-i18n',
{
locales: [
{ code: 'en', iso: 'en-US', file: 'en-US.js' },
{ code: 'pl', iso: 'pl-PL', file: 'pl-PL.js' }
],
langDir: 'lang/',
defaultLocale: 'en',
lazy: true,
vueI18n: {
fallbackLocale: 'en'
}
}
],
// ...
],
Such configuration ensures support for two locales: English and Polish. I defined their codes and files containing the translations. Their names are relative to the langDir parameter.
On top of that, a default language is configured to be selected when user locale is not supported on our website.
This means I need to create two files containing translations in the project:
// lang/pl-PL.js
export default {
title: 'Przepisy na drinki',
pages: {
home: 'Strona główna',
recipes: 'Przepisy {owner}',
},
};
// lang/en-US.js
export default {
title: 'Drink recipes',
pages: {
home: 'Homepage',
recipes: '{owner} recipes',
},
};
Displaying translations in components or routing files comes down to using a readymade method called $t. Obviously, dot-notation can handle nested translations and substituting variables with actual values:
{{ $t('title') }}
{{ $t('pages.home') }}
{{ $t('pages.recipes', { owner: 'Maja' }) }}
It’s similar with links – they are generated by default in the current locale, but you can force specific translations:
<nuxt-link :to="localePath('index')">{{ $t('home') }}</nuxt-link>
<nuxt-link :to="localePath('/')">{{ $t('home') }}</nuxt-link>
<nuxt-link :to="localePath('index', 'en')">Homepage in English</nuxt-link>
<nuxt-link
:to="localePath({ name: 'recipes-id', params: { id:'pisco-sour'} })">
{{ recipe.title }}
</nuxt-link>
Switching between locales is simple and comes down to executing the right method:
<nuxt-link :to="switchLocalePath('en')">English</nuxt-link>
<nuxt-link :to="switchLocalePath('pl')">Polski</nuxt-link>
Naturally, the nuxt-i18n module supports more complex tasks like seo support or distinguishing locales based on the domain, and the Vue I18n library offers a wide range of functionalities, e.g. plural forms or formatting of date, time, and numbers. However, I don’t want to duplicate the documentation, especially that it’s very well written and includes a lot of practical examples.
For our applications, data coming directly from the backend is important as well. It is a good idea to modify the accept-language header in such a way to put the current locale first, followed by the remaining supported languages. The backend should successfully handle such requests and return data in the correct language.

Summary
In this series of articles, we have managed to build a frontend app in accordance with current standards, using tools that shortened our time to market, allowed us to focus on what’s important from the business standpoint, and enabled us to save time.
Frontend is based on a readymade, constantly developed, and proven library of GUI components. We know how to handle routing and communication with external systems. We can manage user sessions and access levels, and the content is available in multiple languages. It all looks more like coding, just like in the case of backend.
I hope that after this series, at least some of you will feel more confident about creating the visual layer of your app/startup, and maybe some will recognise its potential and will have fun doing it.


