

I think we can all agree that serverless architecture has been going viral for a while now. It takes a lot of responsibility away from the developers as well as administrators and lets them focus on the application’s code instead.
Serverless takes care of setting up, running and scaling the environment to fit the needs of the end-users. It started as an environment for running functions written in specific languages that were provided by your serverless provider. Right now it is possible to execute almost any stateless application using Google Cloud Run. If you can run your app using Docker containers, you can profit from serverless architecture thus not wasting your budget and reducing the time to market to an absolute minimum.
In this article, we will deploy an example application using Express.js API with AdminBro auto-generated administration panel. I will use it as a demo site for an import/export feature for the admin panel. You can read more about AdminBro on the official site.
Introduction
For a long time cold starts were a downside of serverless solutions. Sometimes it was the biggest argument against using it on production. Right now, with the beta feature of Cloud Run, you can set the number of minimum instances running at all times:
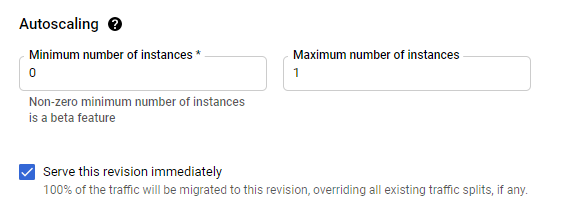
That means you don’t have to worry about cold starts any more! With Cloud Run using containers instead of exposing your service as a function, you’re now also free from the vendor-lock issue. If you choose to run your application on Kubernetes, some Virtual Machine or use different cloud providers you can migrate your application with no changes in your codebase.
Developers in our company use Cloud Run as quick-to-setup testing environments. They perform very well in this role and in some cases they are even faster than production servers due to automatic scaling!
From my point of view, there are no cons of Cloud Run and you can safely use it for your side projects, testing and staging environments, microservices for long-running operations and even as the production environment!
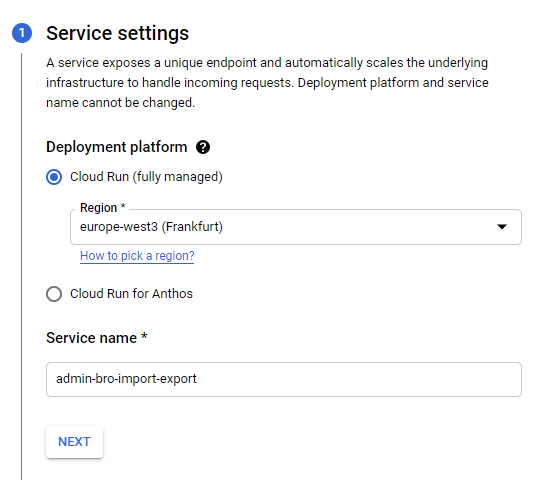
Setting up your first service on Cloud Run
First step: we will need a Dockerfile that will instruct Cloud Build with installation steps for your application. For Express APIs it will probably look similar to this:
FROM node:latest
RUN npm install -g --force yarn
WORKDIR /home/app
COPY package.json .
COPY yarn.lock .
RUN yarn
COPY . .
RUN yarn build
EXPOSE 3000
CMD yarn start
Then we will need a cloudbuild.yaml file that will instruct Cloud Build with exact steps to execute:
- Build an application using Dockerfile
- Push new image to registry
- Update Cloud Run service with a freshly-built image
You can use the example below to enable images caching. That allows consequent builds to be executed and deployed in 3 minutes! Remember to change the service name in the cloud build from `admin-bro-import-export` to the service name you want.
The solution uses caching based on package.json and yarn.lock, which allows Cloud Build to skip the whole flow up to the point of building the source code, if only the dependencies did not change.
steps:
- name: 'gcr.io/cloud-builders/docker'
entrypoint: 'bash'
args:
[
'-c',
'docker pull $_GCR_HOSTNAME/$PROJECT_ID/admin-bro-import-export:$(sha1sum package.json yarn.lock | cut -d " " -f 1 | xargs | tr " " "-") || exit 0',
]
id: Cache
- name: 'gcr.io/cloud-builders/docker'
entrypoint: 'bash'
args:
[
'-c',
'docker build -t $_GCR_HOSTNAME/$PROJECT_ID/admin-bro-import-export:$(sha1sum package.json yarn.lock | cut -d " " -f 1 | xargs | tr " " "-") --cache-from $_GCR_HOSTNAME/$PROJECT_ID/admin-bro-import-export:$(sha1sum package.json yarn.lock | cut -d " " -f 1 | xargs | tr " " "-") .',
]
id: Build
- name: 'gcr.io/cloud-builders/docker'
entrypoint: 'bash'
args:
[
'-c',
'docker push $_GCR_HOSTNAME/$PROJECT_ID/admin-bro-import-export:$(sha1sum package.json yarn.lock | cut -d " " -f 1 | xargs | tr " " "-")',
]
id: Push
- name: gcr.io/google.com/cloudsdktool/cloud-sdk
entrypoint: 'bash'
args:
[
'-c',
'gcloud run services update $_SERVICE_NAME --platform=managed --image=$_GCR_HOSTNAME/$PROJECT_ID/admin-bro-import-export:$(sha1sum package.json yarn.lock | cut -d " " -f 1 | xargs | tr " " "-") --labels=managed-by=gcp-cloud-build-deploy-cloud-run,commit-sha=$COMMIT_SHA,gcb-build-id=$BUILD_ID,gcb-trigger-id=$_TRIGGER_ID,$_LABELS --region=$_DEPLOY_REGION --quiet',
]
id: Deploy
options:
substitutionOption: ALLOW_LOOSE
substitutions:
_DEPLOY_REGION: europe-west3
_GCR_HOSTNAME: eu.gcr.io
_SERVICE_NAME: admin-bro-import-export
_NAMESPACE: default
_LABELS: gcb-trigger-id=441020be-ad53-44a8-b543-df502927d580
_TRIGGER_ID: 441020be-ad53-44a8-b543-df502927d580
_PLATFORM: managed
timeout: 1800s
Automatic deployments using Cloud Build and GitHub
In the next step, select option Continuously deploy new revisions from a source repository and follow the instructions to connect automatic deployments for your GitHub repository. Remember to select Dockerfile as your preferred build entry point. In the advanced configuration tab, check if the listening port is the same as the one you’re exposing in your application.
And that’s it! That should automatically create your first Cloud Run service and set up a trigger that will automatically build your app and deploy it as a new revision every time you push to a specific branch.
Advanced configuration
Now, when your app is up and running you can focus on the details.
Custom domain
When it comes to setting up a domain for your Cloud Run service you have two options.
- Find, configure and buy your domain directly in your GCP panel.
- Connect your app to a domain you already own.
Both options can be found under this link: Cloud Run Domains. When you choose the first option, you just have to complete four steps in the simple configurator. If you already own a domain, you have to set proper DNS records for it. Simply click the verify domain button and it should redirect you to Google Webmaster Center. Then copy a visible DNS record, which should look similar to this:
google-site-verification=<long hash>
Both options can be found under this link: Cloud Run Domains. When you choose the first option, you just have to complete four steps in the simple configurator. If you already own a domain, you have to set proper DNS records for it. Simply click the verify domain button and it should redirect you to Google Webmaster Center. Then copy a visible DNS record, which should look similar to this:
Environmental Variables
Cloud Run environmental variables can be managed in two ways:
- Using Secret Manager
- Placing secrets directly via the service configuration tab in GCP
Decision on what to use is a very individual thing. If you already use Secret Manager to store all your secrets and certificates, it’s probably better to stick with that option. Most of the time, for simple services, it’s easier and faster to just input your secrets by hand. To add new environmental variables to your service click Edit & deploy new revision button on the top of your Cloud Run service overview page. Navigate to the Variables tab and add your variables using the Add new variable button. All the variables will be available in your app as environmental variables.
Summary
Cloud Run is a GCP service that is definitely worth trying. You can deploy your application within 20 minutes and go live without any extra configuration — especially if you’re already working in a Docker environment locally. Cloud Run can be easily duplicated using the “Copy” option on the service list, which makes creating other environments super simple in less than 30 seconds! Plus, with the auto-scaling, you don’t have to worry about anything but the code.


